
How to install vinyl flooring
Are you a weekend warrior looking for a DIY flooring project? Installing vinyl flooring can be a great DIY project, saving you money and giving you the satisfaction of having installed your own flooring. Not sure where to start? We can help!
If you’re a pretty handy person around the house, chances are you already have the tools and skills needed to install your vinyl flooring. You can easily install some vinyl flooring, even if you’re a complete novice!
There are two main vinyl flooring types:click planks or tiles, dryback(glue down).It’s notoriously low maintenance and easy to clean. There is also vinyl flooring that is waterproof! All these features make vinyl flooring the perfect alternative to real hardwood.
For all types of vinyl flooring installations, you should first make sure that your subfloor is both level and clean. This may involve using a self-leveler, sanding, or using an underlayment.
Some vinyl planks, such as waterproof vinyl and rigid core, are thick enough to conceal imperfections in subfloors. However, it’s good practice to level your subfloor before to ensure that no transposing occurs; especially when using thinner vinyl.
Acclimate vinyl flooring to the room by allowing it to sit out and unwrapped for at least 24 hours before installation.
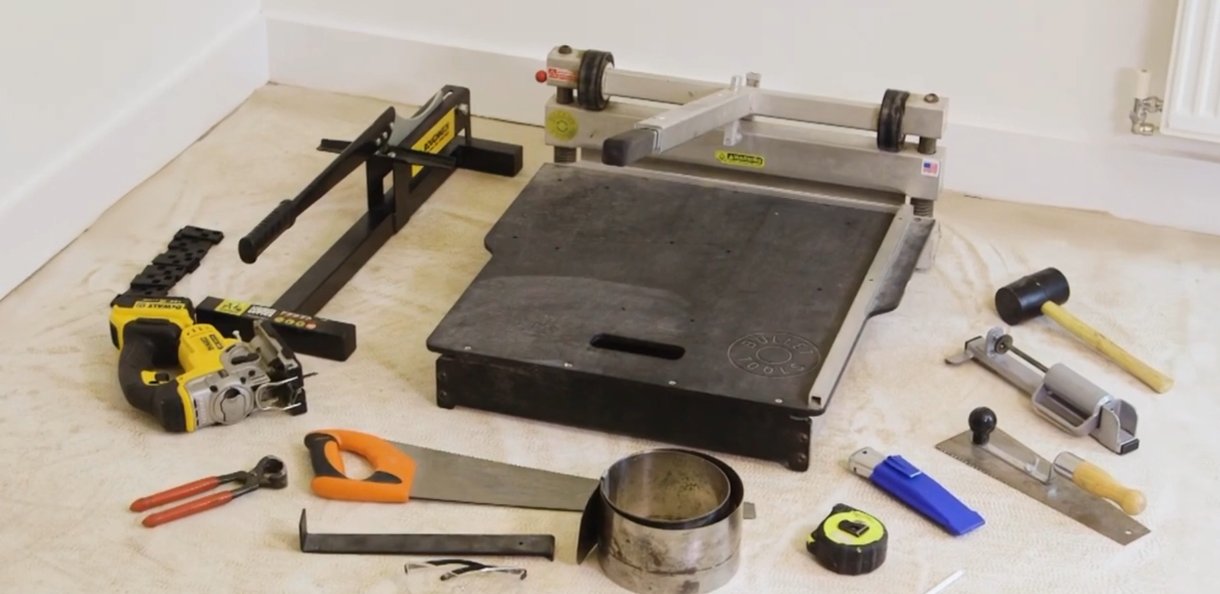
Tools
- Flooring of choice
- Measuring tape
- Sharp utility knife
- Rubber mallet
- Marker
- Spacers
- Tapping block
- Chalk
- T-Square
- Level
- Tile cutter - optional
- Jigsaw - optional
- Finishing molding - optional
- Brad nailer - optional
Leveling
If installing over a concrete subfloor, you’ll want to sand or level any imperfections. That might mean filling in dips or scars with a self-leveling compound, patching concrete, or thinset mortar or sanding down bumps in the concrete. Use your level to check for subfloor imperfections.
Self-leveling compounds can typically be bought in any home store or online. It’s a quick drying concrete substance, so you’ll want to work fast when spreading and leveling.
If you’re installing over ceramic or porcelain tile, you’ll want to use a thinset mortar to fill in any imperfections or deep-set grout.
Check your leveling type for drying times. Typically levelers must dry for at least 24 hours before installing flooring over it.
Undercuts and Baseboards
Before you begin installing, make sure to remove all your baseboards and set them aside. Also, measure the distance between the floor and any doors to make sure they clear when opening.
A good way to measure is using your vinyl flooring and marking where your door or doorjamb will need to be cut. You can cut doorjambs using a jigsaw or another fine tooth saw.
Cutting a door may require more specialized equipment, like a circular saw.
Cleaning
Dust and other particles can inhibit vinyl flooring from clicking together properly, or cause bonding problems when using tape or adhesive.
For this reason, you’ll want to make sure your subfloor is as clean as possible before installation. Be sure to vacuum and sweep up any particles and mop and degrease if needed.
As you install, you may find dust and dirt being kicked up. Keep a broom or vacuum handy to clean up as you go.
Measuring
What’s the saying? Measure twice cut once?
That definitely goes for installing flooring.
If you’re installing vinyl planks, you’ll want to plan the direction of your flooring and then measure the width of the room, dividing by the width of the plank (Room Width / Plank Width). This will tell you how many planks will fit across your room.
The last row of planks should never be cut down past half its original width. That might mean your first row of planks should be cut down slightly smaller to allow the last row to be slightly wider. Make sense? The same applies to vinyl tiles.
How to Install Vinyl Plank Flooring: Tongue and Groove
Your floors are prepped and your flooring is unboxed- what’s next?
If you’re installing luxury vinyl planks (or tiles) that use a tongue and groove locking mechanism, these instructions are for you.
Tongue and groove, also known as click lock vinyl is one of the simplest ways to install vinyl flooring. This type of installation requires no tape or adhesive and creates a floating floor.
Score and Snap

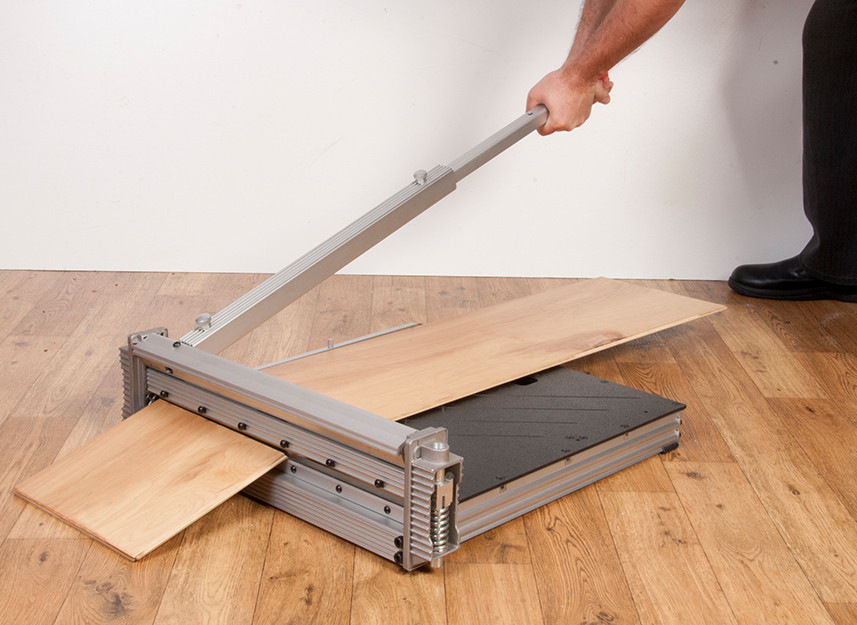
The simplest way to cut a vinyl plank is by scoring and snapping. Using your t-square to score a straight line, lightly score the vinyl plank on the surface side using a utility knife. You’ll need to make several passes.
Then bend along the score line to snap the plank in half. Some people use their knee as a leverage point to easily snap the plank.
Another way to cut vinyl planks or tiles is by using a tile cutter.
Installation Steps
- Set the first plank in the corner of the room, working from left to right. Use your spacers to ensure there is a ⅜” expansion gap from the wall.
- Complete the first row by interlocking the tongue and groove connectors and aligning the seams.
- Continue laying the flooring, using the tapping block and rubber mallet to tap the planks into a locked position.
- When you come up to a wall and need to cut a plank, simply measure the space and mark on the plank where it is you need to cut. You can cut vinyl planks using one of the methods above.
- Use the leftover cut ends that are at least 6 inches or longer to begin your next row in order to stagger the planks and give them a more natural wood floor look.
- Set the plank into the previous row at a slight angle to ensure that it slides into place and interlocks correctly.
- Continue moving down the room ensuring that the planks are interlocked and all the seams have a tight fit. Add spacers every few feet around the edges of the flooring and remove them when installation is complete.
How to Install Vinyl Plank Flooring: Dryback
Begin in the center
An essential rule to installing vinyl tile flooring is to begin at the center of your room, rather than at one of the corners. When you’re about to begin installing the tile, you’ll need to spread an adhesive using a trowel onto the substrate, so the vinyl squares will remain fully bonded. Make sure you’re gently pressing the tiles onto the floor, and once you’ve completed one row, start on the next. It’s highly likely that your row of tiles won’t perfectly fit into your space, so make sure you measure the remaining length of tile needed to complete a row, then cut another piece of tile to fit the adjacent space.
After you’ve laid the tile
Once you have the tile laid down, you’re approaching the home stretch. The best environmental conditions for installation requires keeping the temperature of the subfloor between 65°F to 85°F (18°C to 29°C) for 48 hours prior to, during and 48 hours after installation. Make sure your tiles fit tightly against each other and if you notice any of the gel beginning to ooze out of the edges, quickly wipe it up with a damp rag. Remember, flooring must be installed within two hours of applying the adhesive. You also won’t want to wash your new floor for at least a week because you want to give the adhesive time to settle. Apply pressure to each tile so they bond to the substrate by using a vinyl floor roller. Make sure you don’t walk on it right away either, and give it at least a few hours to bond. Soon enough, you can stand back and admire you’re brand new vinyl tile floor!